
This week we released a major release for Neum AI that introduced a new open-source framework for Python. This framework allows you to build and run data pipelines in your local environment that generate vector embeddings. It provides a collection of data source, embedding and vector database connectors to pick from. Built-ins are pre-processing transformations like loading and chunking, as well as support for selectors to augment the vector embeddings with metadata.
In this blog, we will showcase the process of getting started with creating a basic pipeline that runs locally in our environment. In sub-sequent blogs, we will go deeper into scaling the pipelines.
Brief overview of RAG
If you are new to RAG, welcome! RAG or Retrieval Augmented Generation is a technique to contextualize Large Language Models with data. Imagine you ask an LLM about last week’s meeting. It probably won’t know what you are talking about because it hasn’t been trained with the transcript or data from the meeting. By using RAG, you can take the transcript and data from the meeting and make it searchable so that the model can get context. So when you ask, what did John say during the meeting, the model can search the data and find what John said and use it to answer your question.
The goal with RAG is to do this same process but across large datasets (think all the docs a company has). To do this, the data must be ingested into indexes. To translate the data into a format that we can index, we use vector embeddings. (i.e. numerical representation of the semantic meaning of the data). The vector can be augmented with metadata like the title of the meeting or the time and day to help reduce the search space and improve the quality of the retrieved information for the model.
Building RAG with Neum AI
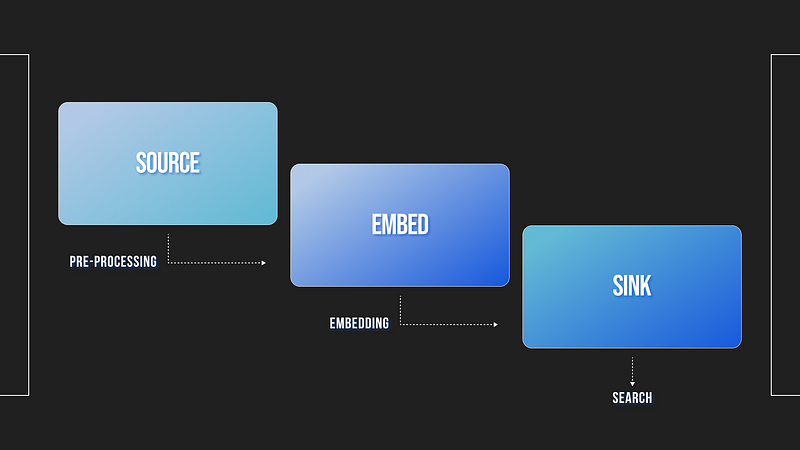
Neum AI is built as a highly distributable and modular data extraction framework that supports RAG. It provides:
- Data connectors that extract data from structured and unstructured sources
- Embed connectors that convert data into vector embeddings
- Sink connectors that ingest vector embeddings into Vector Databases to be indexed
In addition to the main connectors, Loaders, Chunkers and selectors are available to pre-process data.
- Loaders help to translate data types and formats into text
- Chunkers breakdown large text documents into smaller pieces
- Selectors capture metadata from connectors and loaders to augments vector embeddings.
With this structure, Neum AI can help connect your data to large language models and optimize the process of searching for specific context.
Getting started
To get started with Neum AI, we will install the neumai package:
In addition to a Neum AI package, we will use:
- Open AI embeddings model for which you will need an Open AI API Key. To get an API Key visit OpenAI. Make sure you have configured billing for the account.
- Weaviate vector database for which you will need a Weaviate Cloud Service URL and API Key. To get a URL and API Key visit Weaviate Cloud Service.
For this example, we will be configuring a simple Website connector that will extract data from a
website. We will use one of our previous blogs as an example. (Blog: Neum AI — Retrieval Augmented Generation at scale — Building a distributed system for synchronizing and ingesting billions of text embeddings)
Configure the website connector
We will start by configuring the WebsiteConnector . The connector takes a url property. It also supports a Selector to define what information from the connector should be attached to the vector as metadata. In this case we will pick the url
To provide a bit more context, the resulting vectors that will be extracted from this connector will look something like this:
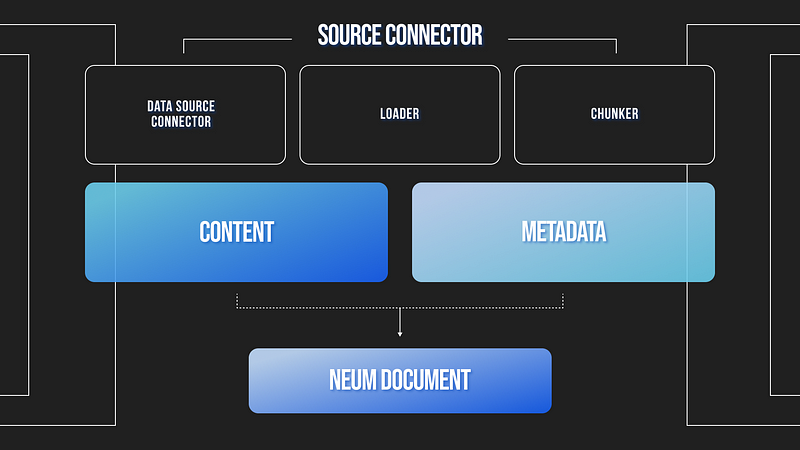
Next, we will choose a loader and chunker to be used to pre-process the data extracted from the source. For the Website connector, we will use an HTML Loader as we are extracting HTML code and will use the Recursive Chunker to split up the text. We will configure the Data Connector, Loader and Chunker into a SourceConnector.
The source connector will take care of extracting, pre-processing and readying the data to be embedded. A single Neum AI pipeline can support multiple source connectors, each with their bespoke configuration.
The source connector has several built-in methods to extract and process the data. The methods can used independently to test sources, but are all integrated upstream. It includes:
- list_files: This method will extract the the identifiers from the data source. This can include download links for hosted files or raw data for structured data sources like Postgres. There are two flavors of this method, full and delta. Full will extract everything vs Delta will only extract data since a given date. It outputs a CloudFile object.
- download_files: This method downloads to local storage / memory the data so that it can be processed. It outputs a LocalFile object.
- load_data: Takes the LocalFile objects and loads them into text. Outputs a NeumDocument objects.
- chunk_data: Takes the NeumDocument objects and splits them into smaller documents. Outputs NeumDocument objects as well.
Configure embed connector
Once we have our data ready to be transformed into vector embeddings, we can now configure the embedding service. For this example, we will use the Open AI connector. This connector uses text-ada-002 the most popular embedding model in the market to generate vector embeddings.
This connector has a single method: embed which takes NeumDocument objects and outputs vector embeddings which are represented as lists of floats. This vectors have to be matched back to the NeumDocuments to add text and metadata. Neum AI has a built-in capability to this using NeumVector constructs.
Configure sink connector
The final connector to configure is the SinkConnector. For this example, we will use the Weaviate connector. Weaviate is a popular open-source vector database.
To configure the Weaviate connector, you will need a connection parameters including: url and api_key. Other parameters are available to further configure the connector. For example, we will use class_name to define a name for the index we are creating.
The sink connectors provide several methods to ingest the data, search its contents and monitor what is inside.
- store: Takes NeumVectors as input and returns the number for vectors ingested.
- search: Takes a vector embedding which can be generated using the embed.embed_query() method and returns NeumSearchResult objects that contain the retrieved vector, metadata and similarity score.
- info: Provides a NeumSinkInfo object that contains the total number of vectors stored in the sink.
Now that we have configured all the pieces, we can now use them together to extract, pre-process, transform and ingest data into a vector database.
Run the pipeline
To put all the connectors together, we provide a Pipeline construct. Alternatively, you can use the set of methods provided to push the data through the different stages. We will configure a pipeline object to help us.
Then we will run the pipeline locally with the provided built-in methods:
Output:
The run method is not recommended for production use cases as it is quite inefficient. It is simply provided as a means to test configurations and make sure things are working. The reason it is inefficient is because of how its designed:
It is simply nested for-loops working through the different stages. The important thing to mention here, is how the methods used are architected. All the methods leverage Python yield and Generator concepts. This means that the methods output data as it is ready allowing to parallelize the next steps in the process. For example as files are listed, I can parallelize the process of downloading them. Once they are downloaded I can parallelize the process of pre-processing them and generating embeddings. It also means that I can batch things so that I can distribute the load across workers.
We won’t go into those details in this blog, but will be the core of what we will talk about in Part 2.
Search the pipeline
To close up this blog, we will test the data that we extracted, processed and ingested into the vector database. We will use the built-in search method in our Pipeline object. This method takes care of generating a vector embedding from the query that we can use to search our vector collection.
Conclusions
In this blog, we introduced the Neum AI framework for building RAG data pipelines. We showed how the framework can be used alongside existing data sources, embedding services and vector embeddings. We also showed how the framework can be customized with pre-processing steps like chunking and loading, as well as augmented with Selectors to add metadata to the vector embeddings.

.png)


