
Note: This is the part 2 to the blog series Building scalable RAG pipelines with Neum AI framework where we discussed building RAG data pipelines using Neum AI.
This week we released a major release for Neum AI that introduced a new open-source framework for Python. This framework allows you to build and run data pipelines in your local environment that generate vector embeddings. It provides a collection of data source, embedding and vector database connectors to pick from. Built-in are pre-processing transformations like loading and chunking, as well as support for selectors to augment the vector embeddings with metadata.
In this blog, we will go deeper into using the Neum AI framework to build a scalable RAG solution that can tackle large datasets. To do this, we will focus on leveraging the process parallelization constructs provided by the framework alongside a worker based architecture with Celery and Redis Queues.
If you prefer to see code directly, find the completed code in GitHub.
Architecture overview
We have a separate write up that goes deep into the reasoning for the architecture. For this blog, we will focus on highlighting some of the core pieces.
To get started, the framework uses yield and Generators across most major methods. Using these constructs provides the ability to efficiently iterate over large data sets while maintaining the function’s state. What this translates to is the ability for us to take results like files being downloaded, files being processed, vector embeddings being generated and push tasks to queues where workers can grab them and execute them.
For example, let's say that I am processing a thousand PDF documents. The first thing we do is download the documents locally so that we can process them. Instead of waiting for all of them to download, as each one is downloaded, we can take it and pass it to a queue so that a worker can start processing it while the other download. The same thing can be done once it is done being processed, we don’t have to wait for the rest to be processed instead, we can start generating embeddings for the document that is ready while the rest get downloaded and processed. This provides a ton of efficiency as we can be doing different tasks at the same time.
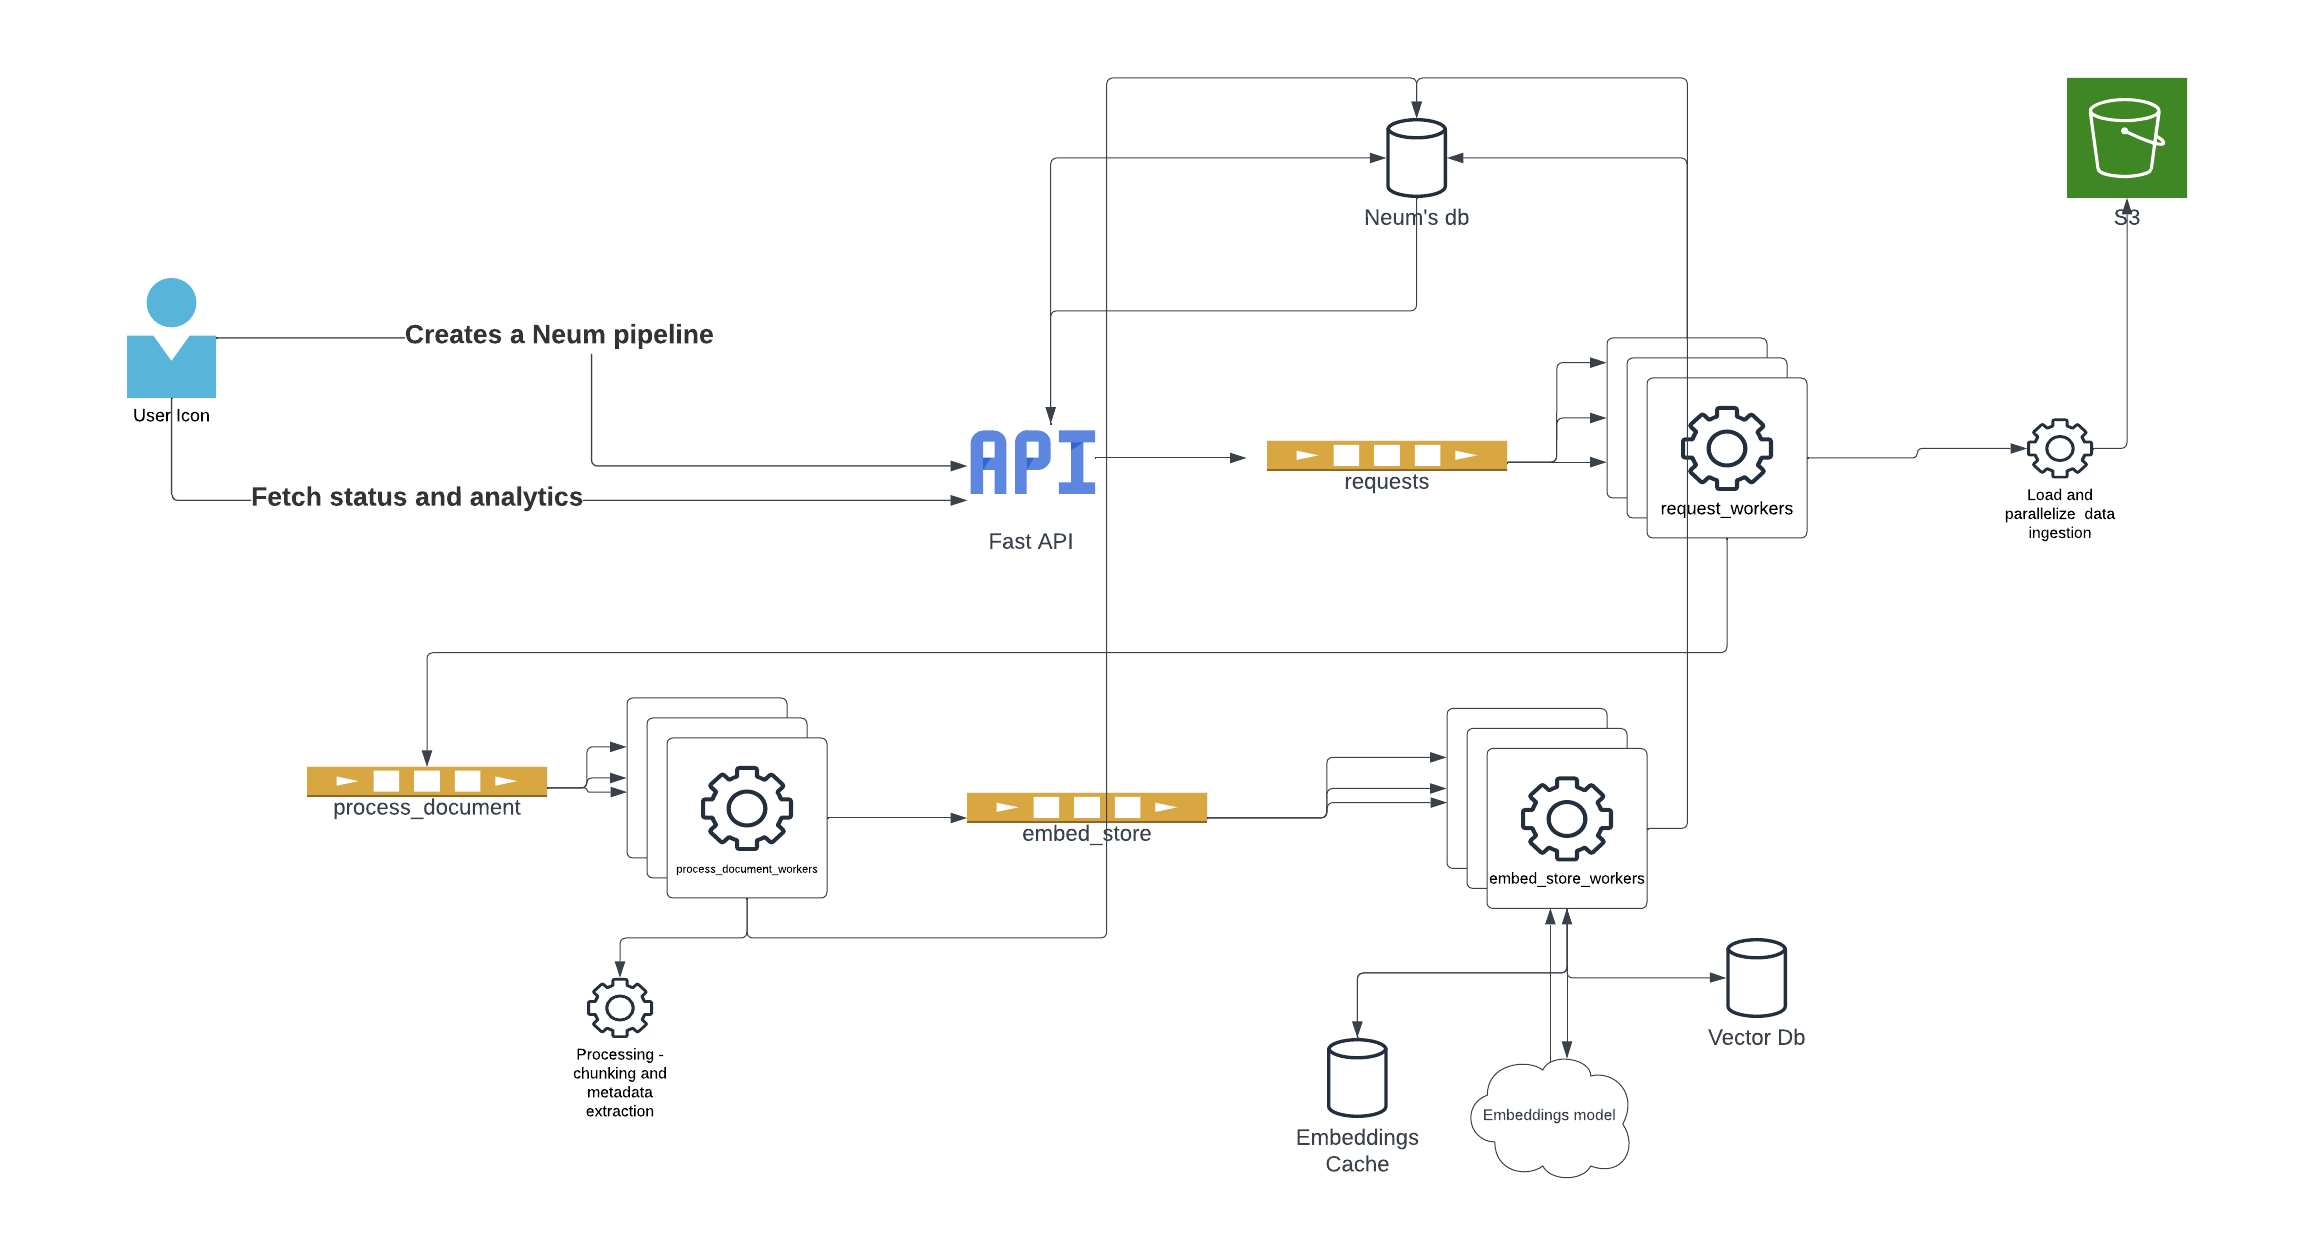
Based on our testing, we have seen that the most efficiency is achieved from parallelizing the architecture into three main processes to which we will assign workers.
- Data extraction: Connecting to data sources and querying the data. This async operation can take time depending on the source and requires pagination which is a perfect candidate to parallelize.
- Data pre-processing: Taking raw data and processing it. This includes loading it based on file extensions or types and chunking it into smaller pieces. Additional custom processing logic can be inserted at this stage.
- Data embed and ingestion: Transforming data into vector embeddings and ingesting it into vector databases.
- Note: This last step can be broken down into two separate workers. That said, what we found was that leveraging the batch ingestion capabilities that vector databases offer where they handle the parallelization. For example Weaviate, provides a num_workers parameter that takes care of this for us.
Now that we have an idea of what we will be building, lets get down to code.
Getting started
We will start by installing some dependencies:
- Neum AI framework
- Celery
- Redis
In addition:
- Install the the redis CLI to run it locally.
- You will need an Open AI API Key for the OpenAI embedding model. To get an API Key visit OpenAI. Make sure you have configured billing for the account.
- You will need a Weaviate Cloud Service URL and API Key for the Weaviate vector database. To get a URL and API Key visit Weaviate Cloud Service.
Next, we will set up our project. Starting with creating a new folder to contain everything:
In that folder we will create two files: main.py and tasks.py
Set up our tasks
In the tasks.py file, we will start by creating a celery set up with some skeleton tasks that we will fill in later. We will set up our Celery app to use a local redis broker which we will configure.
As detailed in our architecture overview, we are setting up three tasks that we will attach workers to. The tasks will be joined through a broker where we will be dropping task requests and where workers will be picking up tasks. In the next sections, we will fill out the contents for each task and build our main.py where we will trigger flows.
Data extraction task
The data extraction task is simple in nature, it will concentrate on using Neum AI SourceConnector to extract data from a DataConnector. The framework provides a variety of data connectors including services like Postgres, Supabase Storage and SharePoint. All the connectors support two extraction methods: list_files_full and list_files_delta. These methods define whether we pull everything inside the connector or only pull the data since the last extraction happened. (This can be customizable to just a given datetime)
Let's modify our tasks.py file as follows:
The function supports both types of sync and generates an async task to be added into our broker queue for a data_processing job. The list_files_full and list_files_delta both output Generator objects so as files are extracted, they are automatically sent out to tasks. In practice it means that even as we continue to extract data, we can also start to process it in parallel.
Data processing task
Now that we have a task ready to extract data and pass it to our processing task, lets configure that.
The data processing will be done using SourceConnector methods to download, load and chunk the data. The framework provides a variety of pre-processing transformations through Loaders and Chunkers Additional logic can be included at this level to process the data further.
Let's modify tasks.py as follows:
At this level, it might seem a bit inefficient to have nested for-loops in this manner. That said, we have found that most of the transformations like chunking and loading are lightweight enough to tackle in this manner. We do anticipate that as more complex transformation is added even some that might require an LLM, additional parallelization could be done here.
In this task, we will also take an opportunity to batch up chunks into sub-groups. Depending on the file, there might hundreds or thousands of chunks, so we want to parallelize the generation of embeddings. We have it set to an arbitrary 200 chunks per batch, but you can configure that further.
Data embed and ingest
Now that we are ready to embed and ingest data, we can configure our next task.
The data embed and ingest task will leverage both our EmbedConnector and SinkConnector methods to generate embedding and ingest them into a vector database.
Let's modify tasks.py as follows:
This task is straightforward we are simply generating embeddings from the documents we processed and then passing them to the vector database for storage. In the middle we are simply aligning things together to generate NeumVector objects which contain the vector embedding, an id and metadata. This step is crucial to ensure we have unique identifiers for each vector which is key for future ingestions.
Triggering our tasks
Now that we have configured all three tasks, we can go back to our main.py and create a trigger to push code onto our broker so that it is picked up by workers running the tasks. We will start with a sample pipeline similar to the one we generated in part 1 of the blog series and add it to main.py. You will need to configure the connectors for OpenAI and Weaviate.
Next, we will add a trigger to push our pipeline to the data_extraction task. There it will trigger the rest of the tasks. Let's modify main.py:
This code will take out defined pipeline and add it to our data_extraction queue for processing.
Let's run it
To get everything ready to run our solution, we first need to get our redis queues running. To do this, we will use the redis CLI:
Once we have the redis queues running, we can now start our Celery based workers. We will have each running on its own command line.
data_extraction worker
data_processing worker
data_embed_ingest worker
Once everything is running, we can now trigger out pipeline. This will distribute the tasks from it into the different queues as it processes the data.
Conclusions
This is just a sample architecture that you can leverage with the Neum AI framework. The number of queues can be modified to be more or less depending on your needs. You can also change the broker and worker library you want to use. The framework provides that versatility to ensure you support your workloads no matter the size or your target architecture.
Find the completed code we walked through in GitHub.

.png)


